
Jeśli chodzi o dokonywanie wyborów w Photoshopie, tak naprawdę istnieją dwa rodzaje ludzi - ci, którzy wiedzą, jak korzystać z narzędzia Pióro i ci, którzy mają problemy. Większość ludzi odkłada naukę korzystania z narzędzia Pióro tak długo, jak to możliwe, podczas gdy inni nigdy nie zaczynają go uczyć, uważając, że jest to zbyt mylące, zbyt skomplikowane i po prostu nienaturalne.
Ostatecznie ich praca w Photoshopie cierpi z tego powodu, ponieważ polegają na narzędziu Lasso do prawie wszystkiego, czego nie mogą wybrać za pomocą prostokątnych lub eliptycznych narzędzi markizy. W tym samouczku Adobe Photoshop położymy kres cierpieniom. Dowiemy się, jak łatwo jest dokonywać wyborów za pomocą narzędzia Pióro.
Teraz, kiedy mówię „łatwy”, nie mam na myśli, że przeczytasz ten samouczek i od razu zostaniesz przekształcony w Pen Master. Nauka korzystania z narzędzia Pióro przypomina naukę jazdy na rowerze. Gdy się nauczysz, będzie to całkowicie naturalne i będziesz się zastanawiać, jak ktoś nie może wiedzieć, jak używać czegoś tak prostego. Ale dotarcie do tego punktu wymaga trochę praktyki i wysiłku, a podczas czytania każdej książki na temat jazdy na rowerze możesz nauczyć się podstaw działania pedałów, biegów i hamulców, dopóki nie zaczniesz walczyć na rowerze aby zachować równowagę, gdy zaczyna się prawdziwa nauka.
Jedną z wielkich zalet narzędzia Pióro jest to, że nie jest to coś, co jest wyłączne w Photoshopie. Daleko stąd! Praktycznie każdy popularny program do edycji zdjęć, grafiki i układu stron korzysta z narzędzia Pióro w takiej czy innej formie, więc gdy nauczysz się go używać w Photoshopie, już dobrze rozumiesz, jak używać go w wielu inne programy również!
Gdzie mogę znaleźć narzędzie Pen?
Zanim zaczniemy rozmawiać o tym, czym jest narzędzie Pióro lub jak go używać, powinniśmy najpierw sprawdzić, gdzie go znaleźć w Photoshopie. Narzędzie Pióro znajdziesz w palecie Narzędzia, pogrupowane w Narzędzia kształtów, Narzędzie Tekst oraz Zaznaczanie ścieżek (biała strzałka) i Zaznaczanie bezpośrednie (czarna strzałka) (patrz zdjęcie po lewej).
Narzędzie pióra programu Photoshop
Oczywiście może to rodzić pytanie, dlaczego, jeśli możemy dokonywać selekcji za pomocą narzędzia Pióro, to czy nie jest ono zgrupowane z innymi narzędziami zaznaczania (Prostokątne narzędzie zaznaczania, Eliptyczne narzędzie zaznaczania, Narzędzie Lasso itp.) W u góry palety Narzędzia? Dlaczego jest tam z innymi narzędziami, które wyraźnie nie są narzędziami selekcji?
To doskonałe pytanie i akurat pojawia się równie doskonała odpowiedź, do której zaraz dojdziemy.
Dlaczego nazywa się to narzędziem „długopis”?
Jednym z pierwszych przeszkód w nauce korzystania z narzędzia Pióro, podobnie jak w wielu innych rzeczach w Photoshopie, jest jego nazwa, ponieważ w końcu, jeśli istnieje jedna rzecz, o której wie każdy, kto kiedykolwiek próbował jej użyć, to nie jest to długopis. Przynajmniej nie taki długopis, o jakim zwykle myślisz, gdy słyszysz słowo „długopis”. Spróbuj wpisać swoje imię i nazwisko w ten sam sposób, w jaki możesz podpisać swoje imię na kartce papieru długopisem, a prawdopodobnie skończysz z poskręcanym, splątanym bałaganem i rzeczami zapętlającymi się wokół siebie (oczywiście przypuszczam, że może równie dobrze być jak podpisujesz swoje imię).
 Pierre Bezier
Jeśli więc nie działa jak tradycyjny długopis, dlaczego nazywa się Pen Tool? Przez lata narzędzie Pióro było nazywane kilkoma rzeczami, a przez to nie mam na myśli tego, co mogłeś nazwać w chwilach frustracji. Być może słyszałeś, że to się nazywa Pióro Beziera lub Narzędzie Beziera, a to dlatego, że został stworzony przez mężczyznę o imieniu Pierre Bezier (to on po lewej), francuski inżynier i wszechstronny inteligentny facet, który wymyślił fantazyjna matematyka, która napędza narzędzie podczas pracy w firmie samochodowej Renault (Pen Tool został pierwotnie stworzony, aby pomóc projektować samochody).
Być może słyszałeś również Narzędzie Pióro zwane Narzędziem Ścieżek, i to jest naprawdę najbardziej odpowiednia dla niego nazwa. Narzędzie Pióro służy do rysowania „ścieżek”. Aby dokonać selekcji za pomocą narzędzia Pióro, po prostu przekształcamy ścieżkę lub ścieżki, które narysowaliśmy na selekcje. Zawsze zaczyna się jednak od ścieżki.
Wtyczka shortcodes, działań i filtrów: Błąd w shortcode (ads-basics-middle-2)
Co to jest ścieżka?
„Ścieżka” jest, szczerze mówiąc, czymś, co może wydawać się trochę nie na miejscu w programie takim jak Photoshop. Powodem jest to, że Photoshop jest przede wszystkim programem opartym na pikselach . Zajmuje miliony małych kwadratowych pikseli, które składają się na typowy obraz cyfrowy, i działa z nimi. Z drugiej strony ścieżki nie mają absolutnie nic wspólnego z pikselami, dlatego powiedziałem, że mogą wydawać się nie na miejscu w programie używanym głównie do edycji i rysowania pikseli.
Ścieżka jest tak naprawdę niczym więcej niż linią przechodzącą z jednego punktu do drugiego, linią, która jest całkowicie niezależna i nie dba o piksele pod nią. Linia może być prosta lub może być zakrzywiona, ale zawsze biegnie od jednego punktu do drugiego i, jak wspomniałem, nie ma nic wspólnego z pikselami na obrazie. Ścieżka jest całkowicie oddzielona od samego obrazu. W rzeczywistości ścieżka jest tak oddzielna, że jeśli spróbujesz wydrukować obraz z widoczną na ekranie ścieżką, ścieżka nie pojawi się na papierze. Ponadto, jeśli obraz został zapisany jako plik JPEG.webp i przesłany do strony internetowej, nawet jeśli obraz został zapisany ze ścieżką widoczną na ekranie w Photoshopie, nie zobaczysz go na obrazie w witrynie. Ścieżki są tylko dla twoich oczu i Photoshopa. Nikt ich nigdy nie zobaczy, chyba że przejdą obok komputera podczas pracy.
Zawsze potrzebujemy co najmniej dwóch punktów, aby utworzyć ścieżkę, ponieważ musimy wiedzieć, gdzie ścieżka zaczyna się i gdzie kończy. Jeśli użyjemy wystarczającej liczby punktów, aby sprowadzić naszą ścieżkę z powrotem do tego samego punktu, od którego się zaczęła, możemy tworzyć różne kształty ze ścieżek, dokładnie tak działają różne narzędzia kształtów programu Photoshop. Narzędzie Prostokąt wykorzystuje ścieżki połączone punktami, aby narysować prostokątny kształt. Narzędzie Elipsa używa ścieżek połączonych punktami do narysowania kształtu eliptycznego i tak dalej. Tak też działa narzędzie Tekst programu Photoshop, chociaż uchwyty Photoshopa wpisują się nieco inaczej niż zwykłe kształty, ale cały tekst w Photoshopie jest zasadniczo wykonany ze ścieżek. W rzeczywistości można konwertować tekst na kształty, co daje wszystkie te same opcje edycji ścieżki z typem, który uzyskuje się podczas pracy z kształtami.
Być może słyszałeś także ścieżki określane jako kontury, a to całkiem niezły opis tego, czym jest ścieżka, a przynajmniej tym, czym może być ścieżka. Możemy narysować kwadratową ścieżkę, a jeśli nie zrobimy z nią nic innego, ponieważ nie wypełniamy jej kolorem ani nie nakładamy na niego obrysu, wówczas mamy tylko podstawowy obrys kwadratu. To samo z kółkiem lub dowolnym innym rysowanym przez nas kształtem. Sama ścieżka jest tylko konturem kształtu. Dopiero gdy zrobimy coś ze ścieżką, na przykład wypełnimy ją, zastosujemy obrys lub przekonwertujemy na zaznaczenie, ścieżka stanie się czymś więcej niż podstawowym konturem.
Możesz wybrać całą ścieżkę za pomocą narzędzia wyboru ścieżki (znanego również jako narzędzie „czarnej strzałki”) lub możesz wybrać pojedyncze punkty lub segmenty ścieżki za pomocą narzędzia bezpośredniego wyboru (narzędzie „białej strzałki”). „Segment” ścieżki lub „odcinek linii”, jak się go czasami nazywa, to dowolna ścieżka między dwoma punktami. Na przykład prostokątna ścieżka składałaby się z czterech punktów (po jednym w każdym rogu), a poszczególne ścieżki łączące punkty razem u góry, u dołu, z lewej i prawej strony w celu utworzenia kształtu prostokąta są segmentami ścieżki . Rzeczywista ścieżka jest kombinacją wszystkich poszczególnych segmentów ścieżki, które składają się na kształt.
To może być trochę mylące, więc zobaczmy, co mam na myśli. Otwórz nowy dokument w Photoshopie. Nie ma znaczenia, jaki to rozmiar. Wybiorę rozmiar 640 x 480 z listy ustawień, ale jak powiedziałem, nie ma znaczenia, jaki rozmiar wybierzesz. Wybierz narzędzie Pióro z palety Narzędzia. Możesz także wybrać narzędzie Pióro, naciskając literę P na klawiaturze.
Dwa tryby narzędzia Pióro
Teraz, zanim przejdziemy dalej, musimy najpierw upewnić się, że pracujemy ze ścieżkami, a to dlatego, że Narzędzie Pióro faktycznie ma dwa różne tryby, w których może pracować, i domyślnie używa drugiego. Po wybraniu narzędzia Pióro, jeśli spojrzymy w górę na pasku opcji u góry ekranu, zobaczymy grupę trzech ikon:

Pasek opcji w Photoshopie pokazuje grupę trzech ikon reprezentujących każdy z trzech trybów Pióra.
Wiem, że powiedziałem, że istnieją dwa tryby, w których narzędzie Pióro może działać, a jednak, jakby dla uproszczenia, istnieją trzy ikony, ale ikona po prawej stronie, czyli ikona Wypełnij piksele, jest wyszarzona i niedostępna podczas pracy za pomocą narzędzia Pióro. Jest dostępny tylko podczas pracy z różnymi Narzędziami Kształtów, więc tak naprawdę są tylko dwie ikony, na które musimy spojrzeć.
Ikona po lewej to ikona warstw kształtu, znana również jako „nie ta, której chcemy” i jest to ta, która jest domyślnie wybrana. Gdybyśmy mieli pracować z narzędziem Pióro z wybraną tą ikoną, rysowalibyśmy kształty, tak jakbyśmy używali dowolnego z różnych narzędzi kształtu, z tym wyjątkiem, że zamiast rysować predefiniowany kształt, taki jak prostokąt lub elipsa, możemy narysować dowolny kształt, jaki chcemy. Jak już powiedziałem, nie tego chcemy. Chcemy ikonę obok, ikonę Ścieżki, więc śmiało i kliknij ją, aby ją wybrać:

Samouczki Photoshop: Kliknij ikonę „Ścieżki” na pasku opcji, aby pracować ze ścieżkami za pomocą narzędzia Pióro.
Po wybraniu narzędzia Pióro i ikonie Ścieżki na pasku opcji kliknij raz w dowolnym miejscu dokumentu. Nie klikaj i nie przeciągaj, po prostu kliknij. Gdy to zrobisz, dodasz mały kwadratowy punkt. Powiększałem to tutaj:

Kliknij raz w dokumencie za pomocą narzędzia Pióro, aby dodać punkt.
Ten pierwszy punkt, który właśnie dodaliśmy, jest punktem początkowym naszej ścieżki. W tej chwili nie mamy właściwie ścieżki. Wszystko, co mamy, to punkt wyjścia. „Punkt” jest technicznie nazywany kotwicą lub punktem kotwiczenia i nazywa się tak, ponieważ zakotwicza ścieżkę na swoim miejscu. Ten pierwszy punkt zakotwicza początek ścieżki do tego miejsca w dokumencie. W miarę dodawania kolejnych punktów każdy z nich zakotwicza ścieżkę na miejscu w tym miejscu.
Dodajmy kolejny punkt. Kliknij gdzieś indziej w dokumencie. Gdziekolwiek to zrobi. Kliknę gdzieś po prawej stronie mojego początkowego punktu:

Samouczki Photoshop: Dodaj drugi punkt kontrolny, klikając gdzieś indziej w dokumencie.
Dodałem teraz drugi punkt kontrolny i spójrz, co się stało. Teraz mam linię prostą łączącą oba punkty razem! Ta prosta linia to moja ścieżka. Jak wspomniałem wcześniej, potrzebujemy co najmniej dwóch punktów, aby utworzyć ścieżkę, ponieważ musimy wiedzieć, gdzie ścieżka się zaczyna i gdzie kończy, a teraz, gdy mamy zarówno punkt początkowy, jak i końcowy, Photoshop mógł połączyć dwa punkty razem, tworząc naszą ścieżkę.
Dodajmy jeszcze kilka punktów dla zabawy. Kliknij kilka razy w różnych miejscach w dokumencie. Ponownie, nie klikaj i nie przeciągaj, po prostu kliknij:
Dodaj dodatkowe punkty, klikając różne miejsca w dokumencie.
Na powyższym obrazku dodałem siedem kolejnych punktów kontrolnych, klikając w różne miejsca za pomocą narzędzia Pióro, i za każdym razem, gdy dodałem jeden, długość mojej ścieżki zwiększała się, ponieważ między poprzednim punktem dodawano „segment” ścieżki nowy punkt. Moja ścieżka składa się teraz z dziewięciu punktów kontrolnych i ośmiu segmentów ścieżki. Mógłbym nadal klikać wewnątrz dokumentu, aby dodać więcej punktów kontrolnych i segmentów ścieżki, ale tak naprawdę chciałbym teraz zamknąć moją ścieżkę, aby uzyskać pełny kształt.
Zamykanie ścieżki
Aby zamknąć ścieżkę, wystarczy ponownie kliknąć początkowy punkt początkowy. Po najechaniu kursorem myszy na punkt początkowy zobaczysz małe kółko w prawym dolnym rogu ikony pióra:

Małe kółko pojawia się w prawym dolnym rogu ikony pióra po najechaniu kursorem na początkowy punkt początkowy ścieżki.
Ten krąg mówi nam, że zbliżamy się do „pełnego koła” naszą ścieżką, kończąc go tam, gdzie się zaczął. Aby go zamknąć, wystarczy kliknąć bezpośrednio punkt początkowy.
Widzimy poniżej, że moja ścieżka stała się ścieżką zamkniętą i jest teraz podstawowym konturem kształtu:
Ścieżka jest teraz zamknięta, kończąc w punkcie początkowym, tworząc zamkniętą ścieżkę.
Mimo że ta ścieżka została narysowana dla zabawy jako przykład rysowania podstawowej ścieżki za pomocą narzędzia Pióro, mogę z łatwością przekształcić tę ścieżkę w zaznaczenie. W tym celu potrzebujemy palety Ścieżek programu Photoshop i przyjrzymy się temu w następnej kolejności.
Przekształcanie ścieżki w zaznaczenie
Do tej pory sprawdziliśmy, co to jest ścieżka i jak narysować podstawową ścieżkę za pomocą narzędzia Pióro programu Photoshop. Ale jak zabierasz się do dokonywania wyboru ze ścieżki?
Łatwo! Istnieje kilka sposobów na przekształcenie ścieżki w zaznaczenie, w tym przydatny skrót klawiaturowy, ale zanim przejdziemy do szybkiego sposobu, spójrzmy na sposób oficjalny. „Oficjalny sposób” polega na użyciu palety Ścieżek programu Photoshop, zgrupowanej z paletą Warstwy i paletą Kanały:
Paleta ścieżek programu Photoshop.
Na pierwszy rzut oka paleta Ścieżki wygląda bardzo podobnie do palety Warstwy w Photoshopie, a Adobe celowo to uczyniło, abyś czuł się bardziej komfortowo z niej. Widzimy miniaturę podglądu kształtu właśnie utworzonej ścieżki, a domyślnie Photoshop nazywa ścieżkę „Ścieżką roboczą”, co jest w zasadzie wymyślnym sposobem powiedzenia „tymczasowy”, tak jakbyś tworzył inną ścieżka bez zmiany nazwy tej ścieżki na coś innego, ta zostanie zastąpiona nową ścieżką. Możesz mieć tylko jedną „Ścieżkę roboczą”, więc jeśli chcesz ją zachować, musisz dwukrotnie kliknąć jej nazwę na palecie Ścieżki i nazwać ją inną nazwą przed utworzeniem nowej ścieżki.
Ponieważ moja ścieżka wygląda trochę jak korona, zamierzam dwukrotnie kliknąć nazwę „Ścieżka robocza”, która pojawi się w oknie dialogowym Zapisz ścieżkę programu Photoshop, i zmienię nazwę mojej ścieżki na „Korona”:

Możesz zapisać tymczasową „ścieżkę roboczą”, po prostu zmieniając jej nazwę.
Kiedy skończę, kliknę OK, a teraz, gdy ponownie spojrzę na paletę Ścieżek, widzę, że moja nazwa „Ścieżki roboczej” została przemianowana na „Korona”:
Paleta Ścieżki pokazująca, że ścieżka została przemianowana na „Korona”.
Po zmianie nazwy ścieżka jest teraz zapisywana i nie zniknie na mnie, jeśli utworzę nową ścieżkę. Ponadto wszystkie zapisane ścieżki są zapisywane z dokumentem Photoshop, więc teraz, jeśli zapiszę mój dokument, ścieżka zostanie zapisana wraz z nim, a następnym razem, gdy otworzę dokument, ścieżka nadal będzie tam na palecie Ścieżki.
Zapisanie ścieżki nie jest czymś, co trzeba zrobić, aby zmienić ją w zaznaczenie. W większości przypadków, gdy używasz narzędzia Pióro do dokonywania wyborów, ścieżka nie będzie potrzebna po dokonaniu wyboru z niej, więc nie będzie potrzeby jej zapisywania. Jeśli jednak chcesz go zapisać, po prostu zmień nazwę na coś innego niż „Ścieżka robocza” i zostanie zapisany.
Aby zmienić ścieżkę w zaznaczenie, jeśli spojrzymy na spód palety Ścieżki, zobaczymy kilka ikon. Te ikony pozwalają nam robić różne rzeczy na naszej ścieżce. Pierwsza ikona po lewej to ścieżka Wypełnij ikoną koloru Pierwszego planu, a jak sama nazwa wskazuje, kliknięcie jej spowoduje wypełnienie naszej ścieżki bieżącym kolorem Pierwszego planu. Ciekawe, ale nie tego chcemy. Druga ikona od lewej to ikona Obrys z ikoną pędzla, która zastosuje obrys do naszej ścieżki za pomocą dowolnego pędzla, który obecnie wybraliśmy.
To świetny sposób na tworzenie ciekawych efektów w Photoshopie, ale to, co tutaj robimy, zmieniając ścieżkę w wybór, nie jest tym, czego chcemy. Tym, którego chcemy, jest trzecia ikona od lewej, ścieżka ładowania jako ikona wyboru:
Ikona „Załaduj ścieżkę jako zaznaczenie” u dołu palety Ścieżki.
Jak tylko kliknę tę ikonę, moja ścieżka wewnątrz mojego dokumentu staje się zaznaczeniem, tak jakbym utworzył go za pomocą dowolnego z bardziej popularnych narzędzi zaznaczania Photoshopa:
Ścieżka została teraz przekształcona w zaznaczenie.
To jest takie proste! W rzeczywistości jest to nawet łatwiejsze, ponieważ istnieje skrót klawiaturowy do przekształcania ścieżki w zaznaczenie bez konieczności przełączania się do palety Ścieżki. Gdy narysujesz ścieżkę i jesteś gotowy, aby przekształcić ją w zaznaczenie, po prostu naciśnij Ctrl + Enter (Win) / Command + Return (Mac), aby Photoshop przekonwertował ścieżkę na zaznaczenie.
Do tej pory może być dla ciebie trochę bardziej oczywiste, dlaczego chociaż Narzędzie Pióro jest bardzo narzędziem do zaznaczania, nie jest zgrupowane z innymi narzędziami do zaznaczania u góry palety Narzędzia. Powodem jest to, że narzędzie Pióro jest przede wszystkim narzędziem ścieżki. Tworzy selekcje, tworząc najpierw ścieżki, i dlatego ma więcej wspólnego z różnymi narzędziami kształtów i narzędziem Tekst, z których wszystkie używają ścieżek, niż z podstawowymi narzędziami zaznaczania, takimi jak Prostokątne narzędzie markizy lub Lasso Narzędzie, które dokonuje wyborów tylko na podstawie pikseli.
Spójrzmy na praktyczny przykład tego, czego się nauczyliśmy do tej pory. Oto zdjęcie znaku stopu przed skalistymi klifami:

Zdjęcie znaku stop.
Powiedzmy, że chciałem wybrać ten znak stopu, aby móc go skopiować na własną warstwę. Znak stop składa się wyłącznie z szeregu prostych linii, co sprawi, że będzie to wyjątkowo łatwe. Najpierw potrzebuję punktu początkowego na mojej ścieżce, więc zacznę od lewego górnego rogu znaku, klikając raz, aby umieścić początkowy punkt kontrolny. W tym przypadku tak naprawdę nie ma znaczenia, gdzie zaczynam ścieżkę, ale zacznę od lewego górnego rogu:
Kliknięcie raz w lewym górnym rogu znaku stop, aby rozpocząć ścieżkę z początkowym punktem kontrolnym.
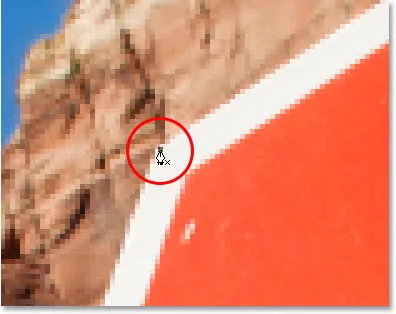
Zauważ, jak powiększam się tutaj po kliknięciu. Łatwiejsze będzie dokonywanie wyborów za pomocą narzędzia Pióro, aby nieco powiększyć obraz. W ten sposób możesz mieć pewność, że trzymasz swoją ścieżkę tylko w obszarze, który chcesz wybrać.
W tej chwili nie mam ścieżki, mam tylko punkt wyjścia dla mojej ścieżki. Aby utworzyć ścieżkę, wystarczy przejść dookoła znaku, dodając punkt zakotwiczenia w każdym rogu, w którym ścieżka musi zmienić kierunek. Gdy dodam każdy punkt kontrolny, pojawi się nowy odcinek ścieżki łączący poprzedni punkt kontrolny z nowym, dopóki nie obejdę całego znaku. Aby zamknąć ścieżkę, po prostu kliknę z powrotem na początkowy punkt początkowy. Trochę trudno to zobaczyć na poniższym zrzucie ekranu, ale teraz mam ścieżkę wokół całego znaku stop, w tym słupka, do którego jest przymocowany, po prostu poruszając się po kliknięciach w rogach, w których ścieżka musi zmienić kierunek:

Ścieżka pojawia się teraz wokół znaku stop na obrazie.
Gdy spojrzę teraz na paletę Ścieżki, widzę bardzo wyraźnie, że mam ścieżkę w kształcie znaku stop:
Paleta Ścieżki programu Photoshop pokazująca ścieżkę narysowaną wokół znaku stop.
Zauważ, jak Photoshop nazwał ścieżkę „Ścieżką roboczą”, co oznacza, że ta ścieżka jest tymczasowa i stracę ją, jeśli utworzę inną ścieżkę, nie zapisując jej najpierw, zmieniając jej nazwę. Nawet jeśli nie utworzę nowej ścieżki, nadal ją zgubię po zamknięciu dokumentu, chyba że najpierw go zapiszę. Nie muszę jednak zapisywać tej ścieżki, więc nie będę się tym martwić. W większości przypadków nie musisz się tym martwić.
Aby przekonwertować moją ścieżkę na zaznaczenie, kliknę ikonę Ładuj ścieżkę jako ikonę zaznaczenia u dołu palety Warstwy lub równie dobrze mogę nacisnąć Ctrl + Enter (Win) / Command + Return (Mac):
Kliknij ikonę „Załaduj ścieżkę jako zaznaczenie” na palecie Ścieżki lub naciśnij „Ctrl + Enter” (Win) / „Command + Delete” (Mac), aby przekonwertować ścieżkę na zaznaczenie.
Gdy tylko to zrobię, moja ścieżka jest przekształcana w zaznaczenie, a znak stop jest teraz wybrany:

Znak stop jest teraz wybrany po przekształceniu ścieżki w zaznaczenie.
Przejdę z powrotem do palety Warstwy i aby skopiować znak stopu na jego własną warstwę, użyję skrótu klawiaturowego Ctrl + J (Win) / Command + J (Mac), który umieszcza znak samodzielnie warstwa powyżej warstwy tła:
Znak stop został teraz skopiowany na osobną warstwę.
Mając teraz znak na swojej własnej warstwie, mogę robić z nim wszystko, co mi się podoba, zamieniając tło innym obrazem lub zmieniając tło na czarno-białe, pozostawiając znak w kolorze, cokolwiek sobie wymyślę. Chodzi o to, że mogłem łatwo wybrać znak, klikając rogi za pomocą narzędzia Pióro, które utworzyło ścieżkę wokół znaku, a następnie po prostu przekształciłem ścieżkę w zaznaczenie.
Jak dotąd w naszym spojrzeniu na dokonywanie selekcji za pomocą narzędzia Pióro w Photoshopie, dowiedzieliśmy się, że Pióro jest narzędziem do zaznaczania, ponieważ są bardziej popularnymi narzędziami zaznaczania Photoshopa, takimi jak prostokątna markiza i narzędzia Lasso, ale zamiast opierać się na selekcjach na pikselach, podobnie jak inne narzędzia, narzędzie Pióro rysuje ścieżki, które można łatwo przekształcić w zaznaczenia, albo z palety Ścieżki, albo za pomocą szybkiego skrótu klawiaturowego.
Dlatego Pióro nie znajduje się u góry palety Narzędzia z tymi innymi narzędziami zaznaczania opartymi na pikselach, ale jest zgrupowane z narzędziami ścieżki, takimi jak różne Narzędzia Kształtów, Narzędzie Tekstu oraz Narzędzia Zaznaczania Ścieżek i Zaznaczania Bezpośredniego . Narzędzie Pióro dotyczy ścieżek, a nie pikseli.
Nauczyliśmy się, że możemy dodawać punkty kontrolne w naszym dokumencie, które zakotwiczają ścieżkę na miejscu, po prostu klikając różne miejsca za pomocą narzędzia Pióro, a gdy dodajemy coraz więcej punktów kontrolnych, tworzymy ścieżkę jako każdy nowy punkt jest połączony z poprzednim punktem nowym segmentem ścieżki. Dowiedzieliśmy się również, że ścieżka jest zwykle nazywana „elementem niedrukowalnym”, co oznacza, że bez względu na to, ile ścieżek dodamy, żadna z nich nie będzie widoczna na papierze, gdy pójdziemy wydrukować obraz . Nie będą również widoczne, jeśli wyświetlimy obraz na stronie internetowej. Ścieżki są widoczne tylko dla nas podczas pracy w programie Photoshop (chociaż inne programy, takie jak Adobe Illustrator, również obsługują ścieżki). Dopiero gdy zrobimy coś ze ścieżką, na przykład wypełnimy go kolorem, zastosujemy do niego obrys lub przekonwertujemy na zaznaczenie, ścieżka stanie się czymś więcej niż tylko podstawowym, niedrukowalnym konturem kształtu.
Widzieliśmy, jak łatwo byłoby użyć narzędzia Pióro do wybrania czegoś w rodzaju znaku stopu poprzez obrysowanie go ścieżką złożoną z szeregu prostych odcinków ścieżki, a następnie przekształcenie ścieżki w zaznaczenie. To świetnie, ale tak naprawdę nie zrobiliśmy jeszcze niczego, czego nie moglibyśmy zrobić łatwiej za pomocą narzędzia Lasso, a nawet lepiej, narzędzia Lasso wielokątne, które zostało zbudowane specjalnie do wybierania płaskich kształtów, takich jak nasz przystanek znak. Są szanse, chyba że masz jakąś dziwną fascynację znakami drogowymi, wcześniej czy później będziesz chciał wybrać coś nieco bardziej interesującego, a przez „interesujący” mam na myśli trudniejsze. Przez „wyzwanie” rozumiem coś, co zawiera krzywe. Zaznaczanie zakrzywionego obiektu w Photoshopie następuje zwykle wtedy, gdy tracisz szacunek dla podstawowych narzędzi zaznaczania. Na szczęście zdarza się też, że narzędzie Pen naprawdę świeci!
Zanim przejdziemy dalej, muszę zauważyć, że wszystko, co do tej pory zrobiliśmy, było dość proste. Kliknij tutaj, kliknij tam, zamień ścieżkę na zaznaczenie, gotowe. Ta kolejna część, w której zajmujemy się rysowaniem krzywych, nie jest wcale taka prosta, chociaż z pewnością nie jest trudna, ale jeśli to jest twój pierwszy raz z narzędziem Pióro lub nie masz z tym dużego doświadczenia, praca z krzywymi może wydawać się trochę nienaturalne, a nawet trochę przytłaczające. To na pewno pojawia się analogia „jazda na rowerze”. Na początku możesz spaść kilka razy i zastanawiać się, jak ktoś to robi, ale im więcej ćwiczysz i im dłużej się go trzymasz, tym bardziej sensowne jest to wszystko zaczyna robić. W mgnieniu oka wyda ci się to drugą naturą i nagle zrozumiesz, dlaczego tak wiele osób przysięga, że Narzędzie Pióra jest największym narzędziem selekcji we wszystkich programach Photoshop! Naprawdę tak jest.
Uzyskiwanie uchwytu na uchwyty kierunkowe
Zacznijmy od Pen Tool. Otwórz nowy pusty dokument Photoshopa lub po prostu usuń to, co dotychczas zrobiłeś w istniejącym dokumencie, aby zacząć od nowa. Następnie z zaznaczonym narzędziem Pióro i opcją Ścieżki na pasku opcji (pamiętaj, że domyślnie jest to opcja Warstwy kształtów, więc musisz upewnić się, że masz zaznaczoną opcję Ścieżki), kliknij raz w dowolnym miejscu w dokumencie, tak jak robiliśmy wcześniej. Tym razem jednak zamiast klikać, aby dodać punkt kontrolny, kliknij, a następnie przeciągnij mysz w niewielkiej odległości od punktu kontrolnego przed zwolnieniem przycisku myszy:
Kliknij w dowolnym miejscu dokumentu za pomocą narzędzia Pióro, a następnie przeciągnij w niewielkiej odległości od punktu kontrolnego.
Gdy skończysz, zobaczysz punkt kontrolny z dwiema wystającymi z niego liniami. Na pierwszy rzut oka możesz myśleć, że udało nam się w jakiś sposób wytyczyć ścieżkę za pomocą narzędzia Pióro. W końcu wygląda na to, że mamy trzy punkty kontrolne, jeden na obu końcach i jeden na środku, z dwoma segmentami ścieżki łączącymi je. Jeśli jednak przyjrzymy się nieco bliżej, zobaczymy, że punkty na obu końcach są nieco mniejsze niż w środku i że w rzeczywistości mają inny kształt. Ten w środku jest kwadratowy i jak widzieliśmy, punkt kontrolny jest kwadratowy, ale te na obu końcach wydają się mieć kształt rombu. Czy niektóre punkty kontrolne są kwadratowe, a niektóre w kształcie rombów?
Nie. Wszystkie punkty kontrolne są kwadratowe i wszystkie mają ten sam rozmiar, co oznacza, że mniejsze punkty w kształcie rombu na końcach nie są punktami kontrolnymi. A jeśli nie są to punkty kontrolne, oznacza to, że linie nie są segmentami ścieżki, ponieważ potrzebujemy co najmniej dwóch punktów kontrolnych, aby utworzyć ścieżkę, a teraz jedynym punktem kontrolnym, jaki mamy, jest ten w środku. Czym więc dokładnie są te linie, które wychodzą z punktu kontrolnego? To uchwyty kierunkowe!
„Ach, uchwyty kierunkowe!” mówisz. "Teraz rozumiem!"
… … …………….
„Zaczekaj, nie, nie wiem. Do cholery, jakie są uchwyty kierunkowe?”
Uchwyty kierunkowe są uchwytami i są używane tylko podczas tworzenia zakrzywionych segmentów ścieżki. Przy tworzeniu segmentów ścieżki prostej nie ma potrzeby używania uchwytów kierunkowych. Zwykle są dwa, chociaż czasami jest tylko jeden i jak już widzieliśmy, wystają z punktów kontrolnych. Nazywa się je „uchwytami”, ponieważ, jak zobaczymy za chwilę, możesz je złapać i przenieść.
Uchwyty kierunkowe kontrolują dwie rzeczy. Kontrolują kąt krzywej i kontrolują długość krzywej i robią to w naprawdę zgrabny sposób. Zazwyczaj są dwa, ponieważ jeden z nich kontroluje kąt i długość krzywej wchodzącej do punktu kotwiczenia, a drugi kontroluje kąt i długość krzywej wypływającej z punktu kotwiczenia.
Zanim przyjrzymy się rysowaniu krzywych za pomocą uchwytów kierunkowych, najpierw zobaczmy, jak kontrolować same uchwyty, ponieważ nasz sukces w rysowaniu krzywych będzie w dużej mierze zależał od naszej zdolności do kontrolowania uchwytów. Nie martw się, to nie, jak mówią, rakieta. Jest tylko kilka prostych rzeczy, których musisz się nauczyć. Widzieliśmy już, jak tworzyć uchwyty kierunku, klikając za pomocą narzędzia Pióro, a następnie przeciągając od punktu kontrolnego. Im dalej od punktu zaczepienia przeciągamy, tym dłuższe będą uchwyty kierunku. Im dłuższy uchwyt, tym dłuższa krzywa. Krótki uchwyt, krótka zakręt. Długi uchwyt, długa zakręt.
Jedną z miłych rzeczy, których nauczysz się dość szybko o narzędziu Pióro, jest to, że jest wyjątkowo wybaczający. Nie ma powodu, aby martwić się poprawnością za pierwszym razem, gdy narysujesz za jej pomocą ścieżki, ponieważ możemy łatwo wrócić i naprawić wszystko, gdy skończymy! Czy umieściłeś punkt kontrolny w niewłaściwym miejscu? Nie ma problemu! Po prostu przenieś go tam, gdzie go potrzebujesz! Zobaczymy, jak to zrobić za chwilę. Czy wyciągnąłeś uchwyt kierunku w złym kierunku? Żaden problem. Chwyć uchwyt i obróć go w żądanym kierunku. Ponownie zobaczymy, jak to zrobić. Czy jeden z twoich kierunków jest za długi czy za krótki? Żaden problem. Po prostu kliknij i przeciągnij go w razie potrzeby dłużej lub krócej (tak, my też zobaczymy, jak to zrobić). Ścieżki są w pełni edytowalne przez cały czas, więc nie ma absolutnie żadnego powodu, aby martwić się popełnieniem błędu lub poprawieniem go za pierwszym razem. Czy to nie sprawia, że czujesz się już trochę lepiej?
Obracanie i zmiana rozmiaru uchwytów kierunkowych
Jak wspomniałem, nazywane są „uchwytami” kierunkowymi, ponieważ można je chwytać jak uchwyty i przenosić. Zobaczmy, jak to zrobić. Najpierw przyjrzymy się, jak obracać oba uchwyty jednocześnie. Używając punktu kontrolnego i dwóch uchwytów kierunkowych, które już utworzyliśmy, przytrzymaj klawisz Ctrl (Win) / Command (Mac). Ikona narzędzia Pióro tymczasowo zmieni się w ikonę Narzędzia zaznaczania bezpośredniego (biała strzałka), a to dlatego, że po wybraniu Narzędzia pióra przytrzymanie „Ctrl / Command” staje się szybkim skrótem do tymczasowego dostępu do Narzędzia zaznaczania bezpośredniego, które jest czego używamy do wybierania różnych części naszej ścieżki. Następnie wystarczy kliknąć bezpośrednio mały kształt rombu na końcu dowolnego z uchwytów kierunkowych (samo kliknięcie „linii” nie zadziała, dlatego zawsze trzeba kliknąć kształt rombu na końcu uchwytu, aby cokolwiek zrobić wraz z nim) i przeciągnij go wokół punktu kontrolnego, aby go obrócić. Podczas obracania jednego z uchwytów drugi uchwyt obraca się wraz z nim w przeciwnym kierunku, podobnie jak piła. Możesz również zauważyć, że jak tylko zaczniesz przeciągać uchwyt, ikona kursora myszy zmieni się ponownie, tym razem w ikonę Narzędzia przenoszenia, ponieważ przenosimy coś z jednego miejsca do drugiego:
Przytrzymaj „Ctrl” (Win) / „Command” (Mac) i kliknij koniec jednego z uchwytów kierunkowych, a następnie przeciągnij uchwyt, aby obrócić go wokół punktu kontrolnego. Podczas przeciągania jednego uchwytu drugi obraca się w przeciwnym kierunku.
Możesz zwolnić klawisz „Ctrl / Command”, gdy zaczniesz przeciągać uchwyt. Nie musisz przez cały czas go trzymać.
Aby zmienić rozmiar uchwytu kierunkowego podczas obracania go, po prostu przeciągnij koniec uchwytu w kierunku punktu kontrolnego, aby go skrócić lub przeciągnij go od punktu kontrolnego, aby wydłużyć. Jak wspomniałem powyżej, krótszy uchwyt spowoduje, że krzywa będzie krótsza, a dłuższy uchwyt spowoduje, że krzywa będzie dłuższa. Nie możesz jednak zmienić rozmiaru obu uchwytów jednocześnie, więc jeśli musisz zmienić rozmiar obu z nich, musisz przeciągnąć każdy z nich dłużej lub krócej osobno. Jedyną rzeczą, którą możesz zrobić obu z nich jednocześnie, jest ich obrócenie. Jeśli zwolniłeś już przycisk myszy po obróceniu uchwytów, a kursor zmienił się ponownie w ikonę narzędzia Pióro i musisz zmienić rozmiar jednego z uchwytów, musisz jeszcze raz przytrzymać „Ctrl / Command”, aby tymczasowo przełącz się z powrotem do narzędzia Zaznaczanie bezpośrednie, a następnie kliknij i przeciągnij koniec uchwytu, aby zmienić jego rozmiar:
Przeciągnij końce uchwytów w kierunku punktu zakotwiczenia, aby je skrócić, lub przeciągnij je z punktu zakotwiczenia, aby wydłużyć je.
Teraz przyjrzyjmy się, jak obracać uchwyty niezależnie od siebie. To rotate one handle without affecting the other one, first release your mouse button if you've been rotating or resizing the handles so your cursor changes back into the Pen Tool icon. Then, instead of holding down "Ctrl/Command", which moves both handles at once, hold down your Alt (Win) / Option (Mac) key and click on the end of either of the direction handles. You'll see your cursor change into the Convert Point Tool icon, which looks like a simplified arrow made of only two lines, almost like an upside down letter "v" (except that it's not quite upside down). Then, simply drag the handle around the anchor point to rotate it, just as you did before, and this time, the handle will rotate independently of the other one, breaking the connection between them:
Hold down "Alt" (Win) / "Option" (Mac) and click on the end of either of the direction handles, then drag the handle to rotate it around the anchor point independently of the other handle.
Again, you can release your "Alt/Option" key after you've started dragging. You don't have to hold it down the whole time.
You can also resize direction handles using the "Alt/Option" key in exactly the same way as you can with the "Ctrl/Command" key. If you're in the process of rotating a handle, simply drag it in towards the anchor point to make it shorter or away from the anchor point to make it longer. If you've already released your mouse button and your cursor is showing the Pen Tool icon again, you'll need to hold down "Alt/Option" once again, then click on the end of the handle and drag it to resize it.
Is there a difference between resizing the handles using "Ctrl/Command" and using "Alt/Option" to do it? Yes there is. If you haven't yet "broken the connection" between the handles by dragging one independently of the other, resizing a handle using "Ctrl/Command" will keep the handles connected together. It won't resize both handles at once, but it won't break the connection between them either so you'll still be able to rotate them together if you need to. If you resize a handle using "Alt/Option", you'll break the connection between the handles. Even if you don't rotate the handle as you're resizing it, the connection will still be broken.
What if you've broken the connection between the handles by rotating them using "Alt/Option" and then want to rotate them together again? Can you "rebuild the connection", so-to-speak, by selecting one of them while holding down "Ctrl/Command" as before? Good question, and the answer is no. Once you've broken the connection between the handles, the "Ctrl/Command" key on its own won't bring it back. You'll need to select one of the handles while holding Ctrl+Alt (Win) / Command+Option (Mac) at that point in order to move the handles together again.
Quick Summary So Far …
We've covered a lot of information here about working with direction handles, so before we move on and start drawing some actual curves, let's do a quick recap:
- To add an anchor point, simply click with the Pen Tool.
- To add an anchor point with direction handles extending out from it, click with the Pen Tool, then drag away from the anchor point before releasing your mouse button. The further you drag, the longer the direction handles will be.
- To rotate the direction handles together, hold down Ctrl (Win) / Command (Mac), which will temporarily switch you to the Direct Selection Tool, then click on the end of either handle and drag it around the anchor point. The other handle will rotate in the opposite direction.
- To rotate the direction handles independently, hold down Alt (Win) / Option (Mac), which will temporarily switch you to the Convert Point Tool, then click on the end of either handle and drag it around the anchor point. The other handle will not rotate.
- To resize handles without breaking the connection between them, hold down Ctrl (Win) / Command (Mac) to switch to the Direct Selection Tool, then click on the end of either handle. Drag it towards the anchor point to make it shorter, or drag it away from the anchor point to make it longer.
- To resize handles and break the connection between them, hold down Alt (Win) / Option (Mac) to switch to the Convert Point Tool, then click on the end of either handle. Drag it towards the anchor point to make it shorter, or drag it away from the anchor point to make it longer.
- To rotate the direction handles together after breaking the connection, hold down Ctrl+Alt (Win) / Command+Option (Mac), then click on the end of either handle and drag it around the anchor point. The other handle will once again rotate with it.
Okay, that pretty much covers the basics of how to control the direction handles. Let's see how we can use them to draw some curves!
We've covered a lot of ground so far. We know about anchor points and direction handles. We know that in order to draw straight path segments, all we need to do is lay down a series of anchor points wherever we need them simply by clicking with the Pen Tool, and as we add more and more anchor points, we add more straight sections to our path. We know how to create direction handles and how to rotate them, either together or separately, and how to resize them.
We know how to turn a path into a selection by clicking on the "Load path as selection" icon at the bottom of the Paths palette or by simply pressing "Ctrl+Enter" (Win) / "Command+Return" (Mac) on the keyboard. One thing I didn't mention yet is that regardless of whether our path consists of straight lines,
curves, or a combination of straight lines and curves, converting it into a selection is done exactly the same way, and we've already learned how to do it, which means we're well on our way to mastering making selections with the pen! All we need to do is get a bit of practice drawing curves, which is exactly what we're about to do!
Nadal przewijasz? Pobierz ten samouczek w formacie PDF!
Drawing A Curve
Let's once again start fresh, either by opening up a new blank document in Photoshop or by deleting what you've already done. We're going to draw our first curve so we can put all of our newly-aquired direction handle knowledge to use. First, with the Pen Tool selected and the Paths option selected in the Options Bar, click once somewhere in your document to add an anchor point. Just click, don't click and drag. You should have one single anchor point on the screen when you're done.
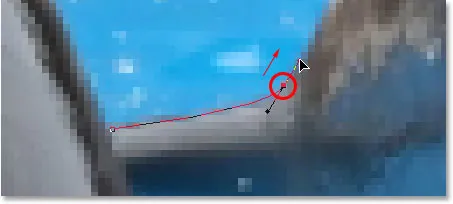
Then, move your mouse cursor up and to the right of your initial anchor point. Click again to add a second anchor point, but this time, drag your mouse a little to the right of the anchor point to drag out direction handles. Hold down Shift as you drag to constrain your movement to a horizontal direction. As you drag out the direction handles, you'll see your path appearing as a curve between the two anchor points! The further you drag your mouse, the longer you make the direction handles, and the more of a curve you create:
Click once to add an anchor point, then click and drag out a second anchor point with direction handles, creating a curved path segment between the two points.
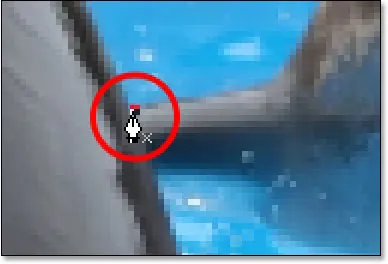
Click down and to the right of the second anchor point to add a third anchor point. This time, don't click and drag, just click:
Add a third anchor point down and to the right of the second one by clicking with the Pen Tool.
As soon as you add the third anchor point, a second path segment will appear, joining the second anchor point with the third one. And because our second anchor point has direction handles extending from it, this new path segment is also curved! We now have a nice, smooth arc starting from the first point on the left, then passing through the anchor point with the direction handles up top, and coming to an end at the third point.
One thing you may have noticed, and you can see it in the screenshot above, is that when you added the third anchor point, the direction handle extending out the left side of the second anchor point disappeared. It's still there, Photoshop simply hid it from view. To see it again, use the keyboard shortcut we've already learned to temporarily switch to the Direct Selection Tool, which is by holding down the Ctrl (Win) / Command (Mac) key, and then click on the second anchor point to select it. As soon as you do, the missing direction handle reappears as if it was there the whole time (which it was):

Hold down the "Ctrl" (Win) / "Command" (Mac) key to temporarily switch to the Direct Selection Tool, then click on the top anchor point to select it. The missing anchor point reappears.
With your "Ctrl/Command" key still held down so you still have access to the Direct Selection Tool, try resizing each direction handle by clicking on the end of each one to select it and then dragging it towards and away from its anchor point. Again, hold "Shift" as you drag to constrain your movement horizontally, and watch what happens. As you increase the length of a handle, you get more of a curve, and as you decrease its length, you get less of a curve. Also notice that each handle controls its own side of the curve. The handle on the left controls the curve coming into the anchor point from the left, and the handle on the right controls the curve flowing out from the anchor point on the right.
Here, I've made my handle on the left shorter, and as we can see, there's much less of a curve now than there was originally, almost becoming a straight line. I've also made the handle on the right longer, and as a result, the curve on the right is now much more pronounced. The faint curve is the original for comparison:
Change the shape of the curves by resizing the direction handles. The left handle controls the left curve, and the right handle controls the right curve.
I'm going to undo my changes by pressing Ctrl+Alt+Z (Win) / Command+Option+Z (Mac) a couple of times to set my direction handles back to their original sizes so they're equal length once again. Now let's try rotating the handles. Hold down "Ctrl/Command" once again to access the Direct Selection Tool, then click on the end of either handle to select it and try rotating it around the anchor point. Since we selected the handle with "Ctrl/Command", both handles rotate together. Here I've dragged my left handle down and to the right, and the angle of the curve on the left changed along with it, now appearing as more of a slope as it rises up towards the anchor point. By dragging the left handle down and to the right, I caused the right handle to rotate up and to the left, and again, the angle of the curve on the right changed along with it, now rising above the anchor point briefly before making a steep decent down to the anchor point on the right. Again, the faint curve is the original for comparison:
Rotate the direction handles to change the angle of the curves. Select a handle while holding "Ctrl" (Win) / "Command" (Mac) to rotate both handles together.
The Dreaded "Loop"
One thing you want to avoid is rotating the handles too far, which will cause your path segments to overlap and create loops. Here, I've rotated my handles all the way around so that the left handle is now on the right and the right handle is on the left, and notice what's happened. My path segments are now overlapping each other, creating a loop:
Rotating the direction handles too far causes the path segments to overlap, creating an unwanted loop in the path.
Loops can be caused by rotating the direction handles too far, as I've done above, but more often than not, they're caused by a handle being too long, making the curve too long and causing it to overlap with itself. If that happens, which it does sometimes as you're drawing a path, simply shorten the length of the direction handle. Most people end up creating a whole bunch of loops in their path when they first start working with the Pen Tool, so don't think you're the only one. No need to panic or become frustrated though. As I said, the problem is most likely being caused by a direction handle being too long, and all you need to do is shorten the handle to "un loop" the loop!
I'm going to press Ctrl+Alt+Z (Win) / Command+Option+Z (Mac) a few times once again to undo my changes and reset my path back to the nice smooth arc I started with. Now, what about rotating the direction handles independently of each other? As we learned on the previous page, to rotate the handles separately, instead of selecting them with "Ctrl/Command", we simply select them while holding down Alt (Win) / Option (Mac), which gives us temporary access to the Convert Point Tool. Click on the end of a handle to select it, then drag it with your mouse to rotate it and this time, the other handle will stay in place, breaking the connection between them.
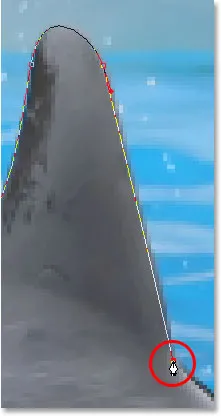
Here, I've selected the handle on the right while holding "Alt/Option" and then rotated it down and to the left. Notice how once again, the angle of the path segment on the right changes to match the new direction of the handle, and this time, the handle on the left, along with the path segment on the left, both stay in place. My path now looks a bit like a shark fin:
Hold down "Alt" (Win) / "Option" (Mac) to temporarily access the "Convert Point Tool", then click on the end of a direction handle to select it and rotate it independently of the other handle.
Moving An Anchor Point
One thing we haven't looked at yet is how to move an anchor point. If you recall, I mentioned on the previous page that the Pen Tool is extremely forgiving, and one of the reasons for it, besides being able to rotate and resize our direction handles after we've created them, is that we can easily move anchor points from one spot to another if we need to. As we've already learned, anchor points anchor a path into place. The anchor points themselves, however, are not anchored into place. You can move an anchor point anywhere, anytime, and any path segments that are connected to it will move and adjust right along with it.
To move an anchor point, hold down Ctrl (Win) / Command (Mac) to temporarily access the Direct Selection Tool as we've already been doing, then simply click on the anchor point to select it and drag it to its new location with your mouse. Any path segments connected to it will move with it to the new location. Here, I've dragged my middle anchor point down a bit from its original location (again, the faint path marks the original location for comparison). Notice how the path itself has changed shape to adjust to the new location of the anchor point:
Hold down "Ctrl" (Win) / "Command" (Mac) and click on an anchor point to select it, then drag it to a new location. Any path segments connected to the point will move with it, changing shape as needed.
Normally, when outlining an object with a path to select it using the Pen Tool, you won't need to move to an anchor point quite as far as what I've done above, but it's very common to go back around your path after you've created it and nudge a few anchor points here and there to fine-tune the path. Once you've selected an anchor point, you can nudge it up, down, left or right using the arrow keys on your keyboard.
Combining Straight Paths With Curves
What if I didn't want both of my path segments to be curves? What if what I needed was for the first path segment to be curved, but the second one needed to be straight? Zobaczmy, jak to zrobić. I'm going to delete my existing path and start over again. First, I'll click to add an anchor point to start things off. Then, just as before, I'll click to add a second anchor point up and to the right of my initial point, and this time, I'll drag out direction handles, which will create a curved path connecting the two points, giving me exactly what I had way up at the start of this page:
Click once to add an anchor point, then click to add a second anchor point and drag out direction handles to create a curve.
I now have my initial curve, but I want my next path segment to be straight. If I was to simply click somewhere to add another anchor point right now, I would get another curve because I have that direction handle extending out from the right side of the last anchor point I added. What I need to do is get rid of that one direction handle. Without a direction handle controlling the angle and length of a curve, we get a straight line.
To remove the handle, leaving only the handle on the left of the anchor point, all I need to do is hold down Alt (Win) / Option (Mac), which will again temporarily switch me to the Convert Point Tool, and then I just click directly on the anchor point. When I do, the direction handle on the right disappears, leaving only the one on the left:
Hold down "Alt" (Win) / "Option" (Mac) and click directly on the anchor point to remove the direction handle on the right, leaving only the one on the left.
Now, with the direction handle gone, if I click to add a new anchor point, I get a straight path segment between the two points :
With the direction handle on the right now gone, clicking to add a new anchor point adds a straight path segment between the two points.
I now have a curved path segment on the left and a straight one on the right! What if I wanted the exact opposite? Suppose I needed to start with a straight path segment and then follow it with a curve? To do that, first I'll start by clicking to add an initial anchor point. Then, since I want a straight path segment, all I need to do is click somewhere else to add a second anchor point, and I automatically get a straight path connecting the two points:
Click with the Pen Tool to add an initial anchor point, then click again somewhere else to add a second anchor point and create a straight path segment between them.
I'm going to keep my mouse button held down after clicking to add my second anchor point because I want my next path segment to be curved, and we know that in order to create a curve, we need a direction handle. To add a handle extending out from the right of my anchor point, I'm going to hold down Alt (Win) / Option (Mac), and with my mouse button still down, I'm simply going to to drag to the right of the anchor point. As I do, a direction handle will drag out along with it:
Hold down "Alt" (Win) / "Option" (Mac) and drag out a direction handle on the right of the anchor point.
Notice that the direction handle extended only from the right of the anchor point, not from both sides, leaving my straight path segment on the left in place. And now that I have my direction handle on the right, all I need to do to create my curve is click to add a third point:
Click to add a third anchor point, which creates a curved path segment between the previous anchor point and the new one.
And there we go! I now have a straight path segment on the left, followed by a curved segment on the right. Of course, most paths you draw are going to consist of more than just three anchor points. Let's say I wanted to continue this path, moving in the same general direction towards the right, and I want my next path segment to be curved as well. Just as I did a moment ago, I would leave my mouse button held down after clicking to add my third point. I would hold down Alt (Win) / Option (Mac) and I would drag out another direction handle. So far, we've only been dragging handles out towards the right, but what you really want to do is drag your handles out in the general direction you want the curve to follow. I want to create a curve that goes up and to the right, so I'm going to drag out a small handle in that same general direction:
Drag out your direction handles in the general direction of the curve.
Wskazówka! A good practice to get into is to keep your direction handles small when first dragging them out, since you never really know how long or at what exact angle they need to be until the actual curve appears, and the curve doesn't appear until you've added both of its anchor points. Once you've added both points and the curve appears, you can easily go back and make any adjustments you need to the handles. You may even want to wait until you've drawn the entire path before worrying about adjusting the handles.
With my direction handle created, I'm going to click to add a fourth anchor point, and I'm going to drag out direction handles from it as well:
Adding a fourth anchor point along with direction handles extending from it.
I now have a third segment added to my path, this one being a curve. Notice that this curve actually has two direction handles controlling it, one extending from the right of my third anchor point and one extending from the left of my fourth point:

The third path segment now has two direction handles, one on either end, working together to control the curve.
The overall shape of this curve is now being controlled by the length and direction of both of these handles. Watch what happens to the curve when I move the handles. I'll drag the bottom handle down and to the right, and I'll drag the top handle up and to the left. I'll also drag both of these handles longer. The faint curve is the original for comparison:
Changing the direction and/or length of either handle changes the overall shape of the curve. After rotating and lengthening both handles, the curve now appears in an "S" shape.
The curve is now a bit "S" shaped, and that's because the bottom handle is controlling the angle and length of the curve as it flows out from the third anchor point, while the top handle is controlling the angle and length of the curve as it flows into the fourth point. Changing the length and/or direction of either handle will change the overall shape of the curve.
I'm going to press Ctrl+Alt+Z (Win) / Command+Option+Z (Mac) a couple of times to undo the changes I made, so the curve is once again in a simple arc shape as it was a moment ago, and I think I'll finish off this path with another straight segment, which means I'll need to remove that direction handle extending out from the right side of the fourth anchor point. We've already learned how to do that, by holding down Alt (Win) / Option (Mac) and clicking directly on the anchor point itself:
Hold down "Alt" (Win) / "Option" (Mac) and click directly on the anchor point to remove the direction handle on the right.
With the direction handle gone, all I need to do now to add a straight path segment is click to add another anchor point:
The direction handle on the right is now gone, so we can add a straight path segment simply by clicking to add another anchor point.
We could continue this path for as long as we wanted, adding more straight segments and curves, but I think we'll stop here because we've pretty much covered everything we need to know about drawing paths with the Pen Tool at this point. That was a lot of information to take in, especially if this is your first time learning about paths. As I mentioned at the beginning, you won't become a Pen Master simply by reading through this tutorial, just as you won't learn how to ride a bike, or drive a car, learn to swim, or play the piano simply by reading about it. But hopefully you have some sense at this point of how to draw paths with the Pen Tool, how to draw straight path segments, how to draw curves by dragging out direction handles, how to change the length and angle of the curve by rotating and resizing the handles, and how to combine straight and curved segments in a path.
To finish off our look at making selections with the Pen Tool, let's see a practical example of how to select an object with curves.
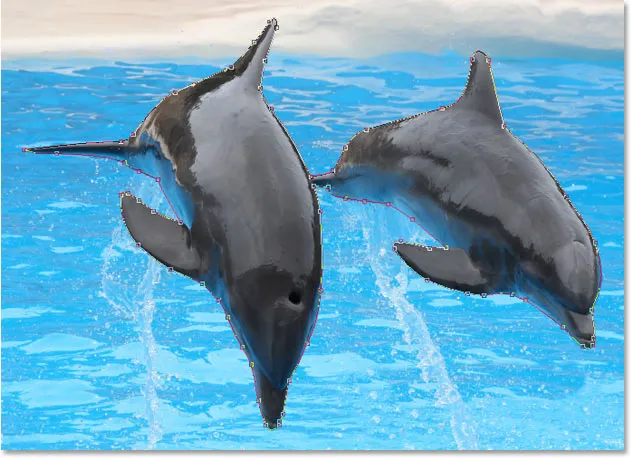
Here, we have a photo of a couple of dolphins leaping out of the water. Definitely a couple of very curvy creatures:

A photo of two dolphins jumping out of the water.
Let's say we want to select these dolphins so we can use them for a design or a collage, or whatever the case may be. If you were to try selecting them with the Lasso Tool, which is most likely what you would end up using if you didn't know how to use the Pen Tool, not only would you have a tough time, you'd have an even tougher time trying to convince yourself that you were happy with the results when you were done. The reason is because the Lasso Tool simply isn't capable of making curved selections very well. The biggest problem with it, besides being a pixel-based selection tool, is that it relies on you having a steady enough hand to move it smoothly around the curves. Even if you don't suffer from a caffeine addiction, you could drive yourself crazy trying to draw a perfectly smooth curve with your mouse, or even with a pen tablet, and when you've finally given up, you'll still be left with a selection full of rough, jagged edges that just scream "amateur!". No one likes to be called an amateur, especially when there's no need for it thanks to the Pen Tool!
Examine The Object First
Whenever you're about to select something with the Pen Tool, before you begin, take a moment to examine the object carefully to get a sense of where you're going to need to place your anchor points. Forget about all the details in the object and focus only on its shape. Where are the areas where the shape changes direction? Which parts of the shape are straight? Which parts are curved? If there's a curve, is it a smooth, continuous arc or does the angle change at a spot along the curve? Visualize in your mind where you're going to need to place your anchor points, because when you place one, you always want to be thinking about the next one and what the path segment between the two points needs to look like.
A Tool Of Elegance
One more thing to keep in mind is that the Pen Tool is meant to be a tool of elegance . It's not a nail gun or a staple gun. You don't want to just go clicking around your shape adding anchor points all "willy nilly" (that's a technical term). When using it to draw curves, you want those curves to be nice and smooth, otherwise we might as well just stick with the Lasso Tool. To keep the curves flowing smoothly, we need to limit the number of anchor points we use to create them. That's why you want to take a moment to examine the object first and visualize where the anchor points need to be. If you can outline a large section of the shape using only one curve with an anchor point on either end, that's what you want to do, because that's what's going to give you the kind of results you're looking for. The kind of results that scream "definitely not an amateur!".
Let's select these dolphins. I'm going to start my path in the middle of the photo, at the spot where the side of the dolphin on the left overlaps the rear flipper of the dolphin on the right. There's no right or wrong place to begin a path. This is just where I've decided to start. The first part of that rear flipper is straight, so since I don't need a direction handle to create a straight path segment, I'm simply going to click once with my Pen Tool to add my first anchor point, which will serve as the starting point for my path:
Adding the first anchor point.
As I mentioned earlier, you'll probably find it helpful to zoom in on your image as you're drawing your path. To scroll the image around on the screen as you're zoomed in, hold down the spacebar, which will switch you temporarily to the Hand Tool and allow you to move the image around on the screen by clicking and dragging it.
The top of that flipper actually has a slight curve to it as it approaches the dolphin's tail section, so for my second anchor point, I'm going to click at the point where the flipper and tail section meet, and I'm going to drag out short direction handles, dragging up and to the right in the direction that the tail section is moving. Notice that I've now created a slight curve along the flipper:
Adding the second anchor point and dragging out small direction handles to add a slight curve to the first path segment.
As I continue up along the tail, I can see that it stays straight for a short distance, followed by a curve to the right, so I'm going to click to add a third anchor point at the spot where the curve begins. This gives me a straight path segment between the previous point and the new one. I know there's a short direction handle extending out from the previous anchor point, which normally means that my new path segment will be a curve, not a straight section, but because the handle is so short and is also moving in the same direction as the path segment, there is no noticeable curve to it. Consider it a "mostly straight" path segment:
Clicking to add the third anchor point, creating a (mostly) straight path segment.
Continuing along, we come to the first real curve in our path. For this, I'm going to need to drag out a direction handle from the anchor point I just added, so I'm going to hold down Alt (Win) / Option (Mac), then drag out a handle in the general direction where I want the curve to flow as it starts. Notice how I'm only dragging out a handle from the one side of the anchor point, not both:
Hold "Alt" (Win) / "Option" (Mac) to drag out a direction handle from one side of an anchor point.
To add the curve, I'll click and drag at the spot where the curve ends, shaping the curve as I drag out the handles until it matches the curve of the dolphin's tail. If I needed to, I could also go back and change the length and direction of the handle at the start of the curve to fine-tune it, but in this case, I don't need to do that:
Adding an anchor point at the opposite end of the curve and dragging out direction handles from it, rotating and resizing them as needed until the curve matches the curve of the object.
The next area of the dolphin is pretty straight, right up until its back begins to merge with its dorsal fin, at which point there's another curve, so I'm going to click to add an anchor point just before the curve up the dorsal fin begins, which is going to give me another "mostly straight" path segment between the previous point and the new point. Then I'm going to once again hold down Alt (Win) / Option (Mac) and drag out a direction handle as I prepare for my next path segment which will be curved:
Click to add an anchor point, then hold down "Alt" (Win) / "Option" (Mac) and drag out a direction handle to prepare for the next path segment.
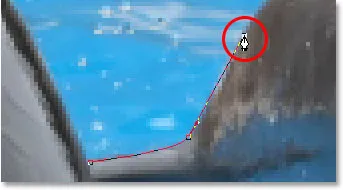
The left side of the dorsal fin consists mainly of one continuous curve upward until it gets near the very top, at which point the shape changes, so to create this curve, I'm going to click and drag at the point near the top where the curve will change direction. As we can see in the screenshot, this adds a curved path segment between the previous anchor point and the new one, but the curve is not yet following along the shape of the fin. It's going to need some fine-tuning:
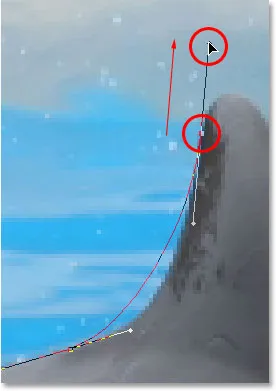
Adding a curve along the left side of the dorsal fin. The curve still needs some adjusting.
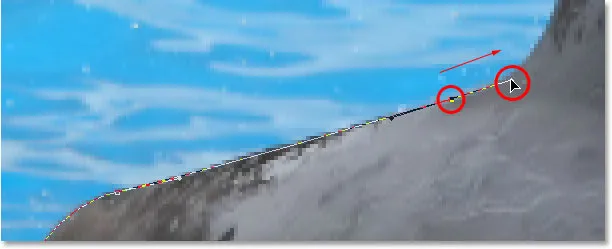
To adjust the curve, I'm simply going to hold down the Ctrl (Win) / Command (Mac) key, which gives me temporary access to the Direct Selection Tool, and I'm going to drag the handle extending out from the bottom anchor point towards the right to lengthen it, which is going to pull the angle of the curve in towards the right along with it, lining it up nicely with the curve of the fin. I've also rotated the top direction handles slightly in a clockwise direction just to be nit-picky, but the majority of the adjustment was done using the bottom direction handle:
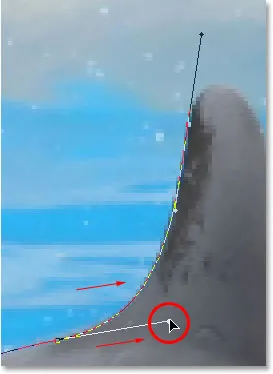
Adjust the curve by adjusting its direction handles.
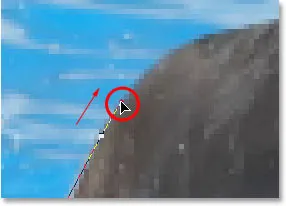
To add a curve around the top of the fin, I'll click and drag on the opposite side of it to add another anchor point with short direction handles. Notice though that we run into a bit of a problem. The direction handle on the left side of the curve is too long and it's pulling the curve away from the top of the fin:
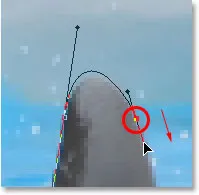
The direction handle on the left of the curve is too long, resulting in the curve not following the shape of the fin.
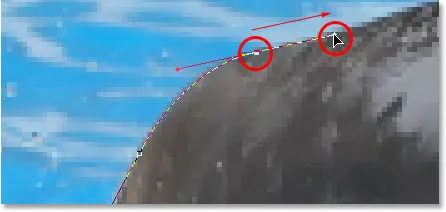
To fix that, all I need to do is once again hold down Ctrl (Win) / Command (Mac), then click on the end of the handle to select it and drag it shorter until the curve is the proper shape:
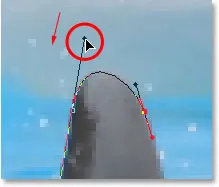
Shortening the length of the direction handle to adjust the shape of the curve.
Let's finish creating our path around the dorsal fin. The remainder of the fin is basically a straight line, so I'm going to click at the base of the fin to add another anchor point which adds the straight path segment, completing our path around the fin:
Adding an anchor point at the base of the fin to finish drawing the path around it.
Since you and I would both be here all day if I was to continue commenting on every anchor point, direction handle and path segment as we make our way slowly around the dolphins, and since we've covered everything we need to know at this point, I'm going to go ahead and draw the rest of the path, outlining both dolphins:
Both dolphins are now outlined by the path.
The dolphins have now been outlined with the path, and if we look at the Paths palette, we can see that sure enough, we have a path in the shape of the dolphins:
Photoshop's Paths palette showing the outline of the dolphins in the preview thumbnail.
As we've learned, Photoshop automatically names the path "Work Path", which means it's temporary and will be replaced if we start a new path. If you wanted to save it, you would need to double-click on the name "Work Path" and rename it to something else, like "Dolphins" in this case. I'm not going to worry about that, since I have no need to save it. All I want to do at this point is convert my path into a selection, and since I'm already in the Paths palette, I'll do that by clicking on the Load path as selection icon at the bottom of the palette:
Clicking the "Load path as selection" icon at the bottom of the Paths palette.
I could also have used the keyboard shortcut Ctrl+Enter (Win) / Command+Return (Mac) . Either way converts my path into a selection, and if I look at my photo, I can see that my path has indeed become a selection around the dolphins:

The path around the dolphins has now been converted into a selection.
Gdzie dalej?
Mamy to! The dolphins are now selected and ready for whatever plans we have for them. And with that, we wrap up our look at drawing paths and making selections with the Pen Tool in Photoshop! Aby uzyskać więcej informacji na temat narzędzi do zaznaczania w Photoshopie, zobacz nasze Jak wybierać w serii Photoshop. Odwiedź naszą sekcję Podstawy Photoshop, aby uzyskać więcej tematów Photoshop!